EuroDat Frontend
Architecture
Design patterns
The EuroDaT platform frontend is based on Angular and follows the Angular style guide. The application is structured in modules, components, services, and models. Angular is a hierarchical component-based framework, and we make heavy use of that to better organize the frontend code for development, testing and deployment purposes.
The EuroDaT platform frontend represents a private subset of the whole EuroDaT's organisational website and is only accessible to authenticated EuroDaT participants. EuroDaT's organisational website (https://eurodat.org) is managed and provided by the TYPO3 CMS containing a lot of static sites. The EuroDaT platform frontend is completely independent of TYPO3 and is accessible on the subdomain (https://app.eurodat.org).
Operations
Deployment
In Kubernetes, the EuroDaT app is deployed in its own namespace frontend. The
page is served using the nginx web server. Whether the frontend is
accessible from outside the cluster can be configured by the variable
enableFrontendIngress.
Which paths are routed to the web page?
All traffic whose path is not explicitly defined in another HTTPRoute will be
routed to this page. This is achieved by using the path / in the route
definition. If any other route defines a more specific path, that path will be
prioritized over / since it then has the same prefix and is longer.
Local development environment
Prerequisites
If you don't have Angular CLI installed, please install it with
pnpm install -g @angular/cli. Once done, please install required packages with
pnpm install. Make sure that you use Angular version 17 or above!
tilt
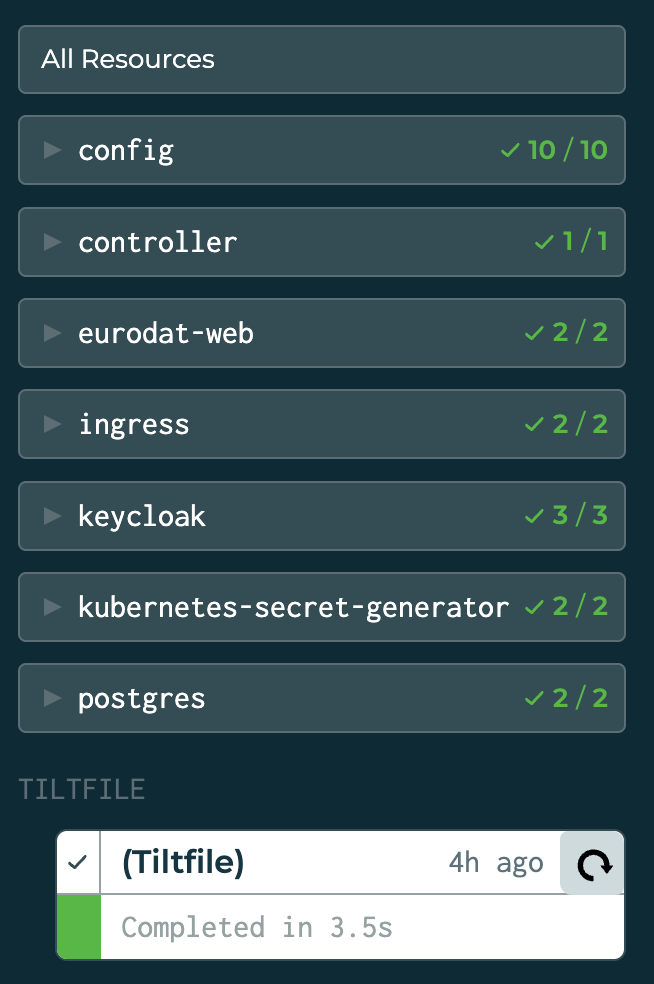
For local development we recommend a more streamlined set of tilt resources which ignores most of the backend services and third party components:
This includes only a subset of tilt resources in contrast to the fully fledged setup.
If the frontend development evolves, and you need more backend services, you can
always switch to the full setup with make start or adjust the list of excluded
services.
Local Development with ng serve
Please create the environment.standalone.ts file in the environments folder
like:
export const environment = {
    clusterUrl: 'https://YOUR_FQDN/', // This URL must be ended with an slash
    keycloakUrl: 'https://auth.eurodat.org/',
    keycloakRealm: 'eurodat',
    keycloakClient: 'eurodat-app',
    useKeycloak: '', // set to noKeycloak in order to disable keycloak entirely
    eurodatAppCssSource: 'https://eurodat.org/fileadmin/templates/css/styles.css',
}
or use the environment.standalone.template.ts as a template.
Run ng serve eurodat-app to test the entire EuroDaT app. Navigate to
http://localhost:4200/. The application will automatically reload if you
change any of the source files.
NPM tool window in IntelliJ IDE
For frontend development, some pre-defined pnpm/pnpx scripts are available in
package.json for testing, launching cypress or building. IntelliJ offers a
nice one-click-solution to run these
scripts: NPM tool window.
Here is a table of the scripts currently available in the package.json file:
| Script | Command | Description |
|---|---|---|
| start-eurodat-app | ng serve eurodat-app |
Starts the Angular development server for the entire EuroDaT app. |
| build-prod-eurodat-app | ng build eurodat-app --configuration production --output-hashing none --base-href ./ |
Builds the host configuration of the Angular application for production with output hashing disabled and base href set to ./. |
| build-prod-eurodat-app-local | ng build eurodat-app --configuration production_local --output-hashing none --base-href ./ && mkdir -p dist/eurodat-app/keycloak && touch dist/eurodat-app/keycloak/env.js |
Similar to build-prod-eurodat-app, but it also creates a env.js file in the dist/eurodat-app/keycloak directory. This allows local production build testing in a Apache2/nginx local web server. |
| test-component-test | cypress run --component |
Runs the component tests using Cypress. |
| test-coverage-summary | nyc report --reporter=text-summary |
Generates a summary of the test coverage using nyc. |
| test-check-coverage | nyc check-coverage |
Checks if the test coverage meets the thresholds specified in the nyc configuration. |
| test-component-run-all | pnpm run test-component-test && pnpm run test-check-coverage && pnpm run test-coverage-summary |
Runs all component tests and coverage checks. |
| cypress | cypress open |
Opens the Cypress test runner. |
| eslint | eslint . --fix |
Runs ESLint on the project and automatically fixes any fixable issues. |
| eslint-ci | eslint . |
Runs ESLint on the project without automatically fixing issues. This is typically used in a continuous integration environment. |
| prettier | prettier . --write |
Runs Prettier on the project and automatically formats any files that don't adhere to the Prettier configuration. |
| prettier-ci | prettier . --check |
Runs Prettier on the project without automatically formatting files. This is typically used in a continuous integration environment. |
| stylelint | stylelint "**/*.scss" "!**/dist/**" --fix |
Runs Stylelint on all SCSS files in the project (excluding those in the dist directory) and automatically fix any fixable issues. |
| stylelint-ci | stylelint "**/*.scss" "!**/dist/**" |
Runs Stylelint on all SCSS files in the project (excluding those in the dist directory) without automatically fixing issues. This is typically used in a continuous integration environment. |
| htmlhint | pnpx htmlhint . --ignore="**/coverage-component/**, **/cypress/**, **/dist/**" |
Runs HTMLHint on the project, ignoring certain directories. |
| firefox-e2e | cypress run --browser firefox --headless --reporter junit |
Runs end-to-end tests using Cypress with Firefox in headless mode and the JUnit reporter. |
| firefox-component-test | cypress run --component --browser firefox --headless --reporter junit |
Runs component tests using Cypress with Firefox in headless mode and the JUnit reporter. |
| chrome-e2e | cypress run --browser chrome --headless --reporter junit |
Runs end-to-end tests using Cypress with Chrome in headless mode and the JUnit reporter. |
| chrome-component-test | cypress run --component --browser chrome --headless --reporter junit |
Runs component tests using Cypress with Chrome in headless mode and the JUnit reporter. |
| edge-e2e | cypress run --browser edge --headless --reporter junit |
Runs end-to-end tests using Cypress with Edge in headless mode and the JUnit reporter. |
| edge-component-test | cypress run --component --browser edge --headless --reporter junit |
Runs component tests using Cypress with Edge in headless mode and the JUnit reporter. |
Note: Make sure to use git bash as default runner for npm scripts on Windows: How to set GitBash as the default NPM script runner on Windows
Code scaffolding
Generate a new Angular component to host the frontend components
Every new page or custom element requires a new Angular component in the Angular
host project to be developed and tested properly. Create a new component with
the following command:
ng generate component DESIRED_SUBFOLDER/COMPONENT_NAME --standalone=true --inline-style=false --inline-template=false --prefix=PREFIX_NAME --project=host --style=scss
The prefix <desired-subfolder>/ on <component-name> ensures that the
component will be placed in the specific subfolder of the Angular project (
app/<desired-subfolder>/<component-name>). The --standalone=true flag is
used to generate a standalone component to follow the latest Angular design
patterns. The --inline-style=false and --inline-template=false flags are
used to generate separate style and template files. The --prefix=prefix-name
flag is used to set the prefix for the generated component. The --project=host
flag is used to set the project where the component should be generated. The
--style=scss flag is used to set the style file extension to SCSS. Delete the
respective <component-name>.spec.ts after component generation, as it is not
used for testing.
Embed the new component by adding the following code as last line to the
<component-name>.component.html
Note: Replace APP-NEW-COMPONENT with the actual selector of your component (
which is usually `).
prefix_name-component_name
and import the component within
import {Component} from '@angular/core';
import {AppComponent as HostAppComponent} from './src/app/app.component';

@Component({
    selector: 'app-dashboard',
    standalone: true,
    imports: [HostAppComponent], // Use the aliased component here
    templateUrl: './dashboard.component.html',
    styleUrl: './dashboard.component.scss'
})
export class DashboardComponent {

}
As components need to be unique, we have to rename the AppComponent to a unique
name using the alias statement, for example, HostAppComponent.
Generate a new Angular library for shared code
Use the following command to create a new Angular library within the EuroDaT context:
ng generate library ngx-LIBRARY_NAME --prefix=LIBRARY_PREFIX --project-root libraries/ngx-LIBRARY_NAME --standalone
The --prefix=<library-prefix> flag is used to set the prefix for the generated
library. The --project-root libraries/ngx-<library-name> flag is used to set
the project root directory, as Angular libraries are treated differently than
Angular projects. The --standalone flag is used to generate a standalone
library that can be used in other Angular projects like EuroDaTs web components
or the host mock.
As we do not provide an EuroDaT internal NPM registry, we have to link the
library to the web component projects and the host project directly. To do so,
first, we have to adjust code within tsconfig.json file. Change the element
compilerOptions.paths.ngx-<library-name> from
{
    "compilerOptions": {
        "outDir": "./dist/out-tsc",
        "paths": {
            "ngx-LIBRARY_NAME": [
                "./dist/ngx-LIBRARY_NAME"
            ]
        }
    }
}
to
{
    "compilerOptions": {
        "outDir": "./dist/out-tsc",
        "paths": {
            "ngx-LIBRARY_NAME": [
                "./libraries/ngx-LIBRARY_NAME/src/public-api"
            ]
        }
    }
}
This will enable both the web component projects and the host project to
directly import the library from the source folder of the library. Consequently,
the steps of building and publishing to an NPM registry become unnecessary.
Further, changes in source files are automatically processed with
ng serve host.
Next, we have to import the library in the <app/component name>.component.ts
files of the web component projects and the host project, respectively where
want to make use of the component:
Within the component's HTML file, we can reference the library's components like:
As a final housekeeping step remove the component's and service's spec.ts
files as well as the reference inside the angular.json file:
{
    "test": {
        "builder": "@angular-devkit/build-angular:karma",
        "options": {
            "tsConfig": "libraries/ngx-LIBRARY_NAME/tsconfig.spec.json",
            "polyfills": [
                "zone.js",
                "zone.js/testing"
            ]
        }
    }
}
For better maintenance, have the template and style definitions in separate files. Replace the inline template and style strings in the library's component typescript file
with the following code
and create the corresponding files in the library's component folder.
Build
Development build
To develop, live preview and test the mocked host, its web components and shared
libraries always use ng serve host. Direct access to the web components and
libraries are not possible as they are not bootstrapped.
Production build
The build artefacts for the docker image have to be created by calling the command
The build artifacts will be stored in the dist/ directory.
Library build
No extra build step is required for the shared libraries as they are built together with the web components and the host project.
Testing
Our test framework is cypress for both component/unit and e2e testing. An interactive and user-friendly UI can be opened with the following command:
Component Test
In the following, component testing includes also unit tests, since for the frontend setup as we have it, they can be treated equally.
A major advantage of the component tests is that they run completely without cluster and therefore they also run fast. This also means that if there are any dependencies to other services (e.g. API calls, Keycloak, ...) these interaction have to be mocked.
A component test may be only mounting a button and click on it. Or call a helper method and check for correct return (like a classical unit test).
Component tests should be used and written generously and test edge cases of the UI (error handling) and not only the "happy user path" as they are responsible for our code coverage.
e2e Test
E2e tests need the cluster up and running and test the setup as would a user. They are (compared to component tests) slower and therefore precious. When writing e2e tests, take care of artifacts that may stay after running your test (e.g. registering a new user, interaction with external services, emails that are sent).
e2e tests should depict full user journeys / user stories e.g. " As a user, I want to register on EuroDaT, onboard my company and see the progress of the onboarding in my dashboard."
Code Coverage Measurement
We measure only the coverage of the component tests. This incentives the usage of component tests over e2e-tests. The code coverage measurement is setup following this guide.
The current thresholds (branch, statements, lines, ... ) of coverage can be
configured in package.json. The (total) coverage is also displayed in a MR
with successful pipeline in GitLab.
The code coverage is measured with every run of the component tests. The following three scripts are running in the pipeline and can also be executed locally (for a one-click solution in the IDE see this section: NPM tool window in IntelliJ IDE).
Visual and interactive results can be found in
frontend/eurodat-app/coverage-component/lcov-report/index.html.
Pipeline
In the pipeline, both component and e2e tests run. Any dev pipeline covers only the default browser, whereas the nightly covers multiple different browsers and browser versions.
Component tests and coverage check run in the build and code_quality stages, whereas e2e tests run with the backend e2e tests (after build).
Code coverage results are uploaded to sonarcloud. Sonarcloud computes the coverage on newly added files of the current branch. The global sonar threshold lies at 70%.
Maintenance
We use NPM as Angular package manager to provide the EuroDaT frontend with required external dependencies like Keycloak integration or Bootstrap CSS framework. As Angular does not provide an automated update of external dependencies, we have to update the dependencies manually.
To do so, we have to run the following commands:
Minor updates
To avoid breaking changes in Angular CLI and third party components Angular provides a command to update all dependencies to the latest minor version.
-
pnpm outdatedto get a list of outdated dependencies. Example output would look like: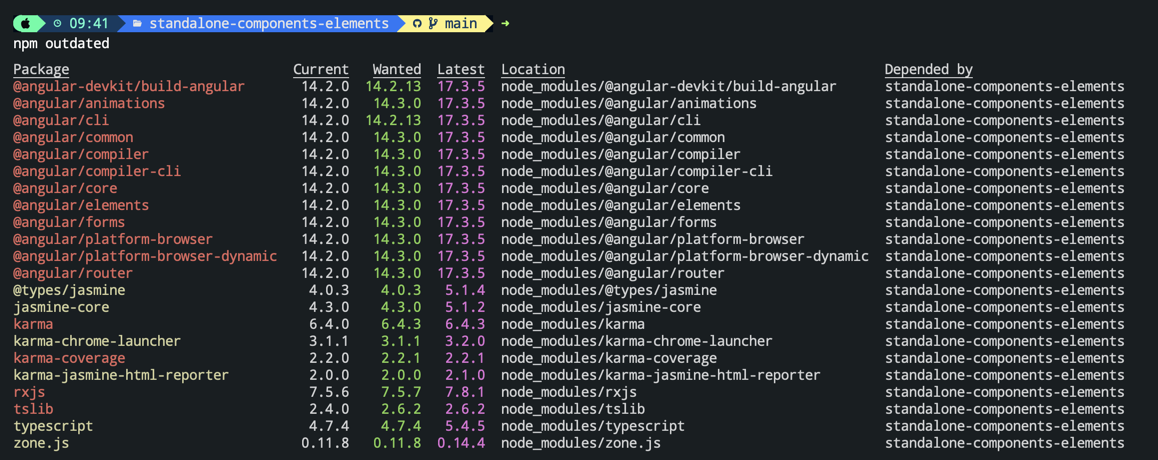
-
Run
ng update @angular/core @angular/clito update Angular CLI and Angular Core to the latest minor version. You can skip the package names to update all dependencies at once. -
Run
pnpm outdatedagain to check if all dependencies are up-to-date. Column "Current" matches "Wanted" for all dependencies. Column "Latest" shows the latest version available, however it could break you code.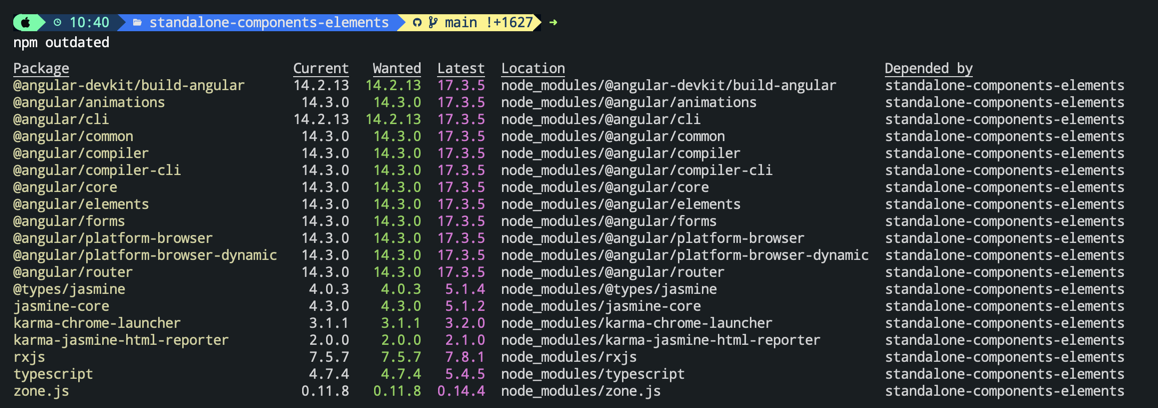
-
To make use of the updated dependencies, run
pnpm installto update the pnpm-lock.yaml file. If you run into any kind of error, try removing both the node_modules folder and pnpm-lock.yaml file and runpnpm installagain.
Major updates
If you need to migrate to the latest major version of Angular or any other dependency, you have to follow the steps below:
-
Install npm-check-updates using
pnpm i -g npm-check-updates -
Check for outdated dependencies using
ncu. Example output would look like: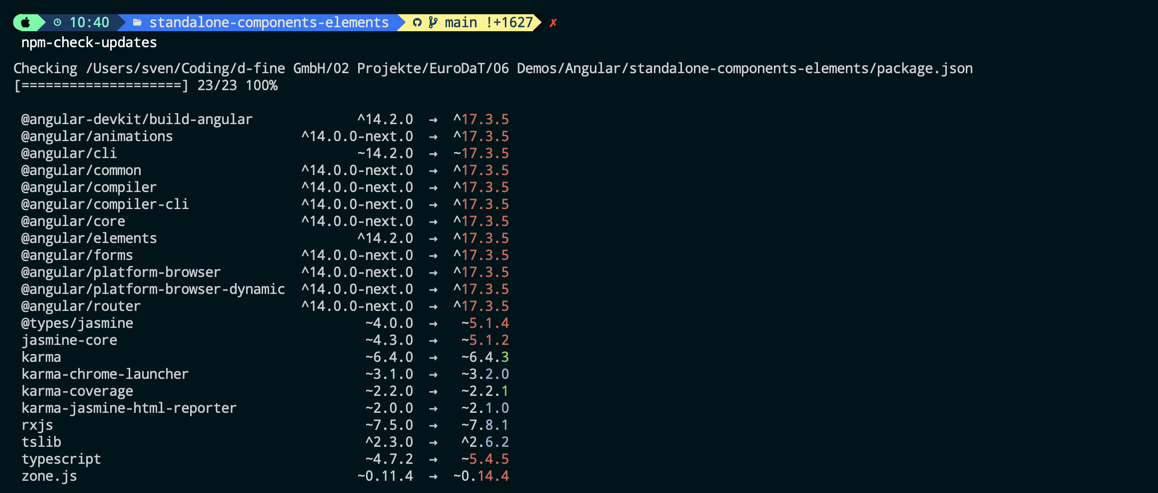
-
Run
ncu -uto update the package.json file with the latest versions of all dependencies. -
Run
ncuagain to check if all versions have been updated in the package.json file.
-
To make use of the updated dependencies, run
pnpm installto update the pnpm-lock.yaml file. If you run into any kind of error, try removing both the node_modules folder and pnpm-lock.yaml file and runpnpm installagain.
All above steps are obsolete once we have https://eurodat.atlassian.net/browse/EDTBUC-2049 implemented.
Keep in mind that you still have to refactor your code if any breaking changes have been introduced by the updated dependencies like deprecated function calls.
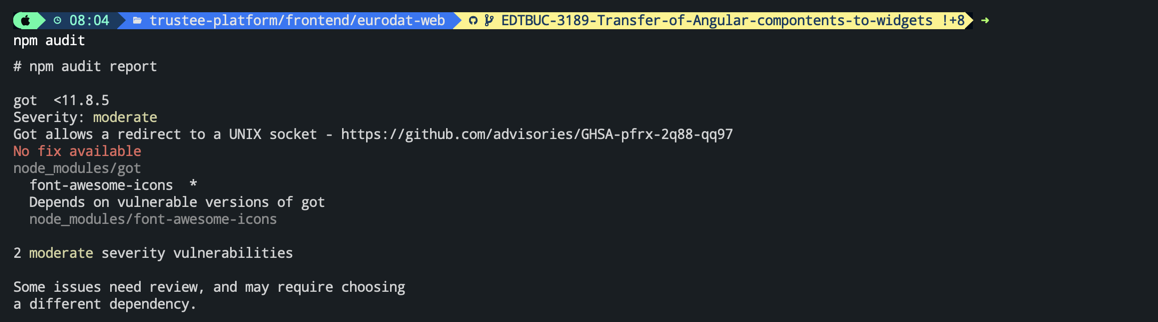
There might still be some open security issues with the updated dependencies.
Run a final check with npm audit to see if there are any security issues left.
Eslint, stylelint and Prettier
As linter, we use eslint for the code quality check of TypeScript code,
htmlhint for html and stylelint for
scss-files.
As formatting tool we use prettier, mostly in their default configuration.
You can find the configurations in eslint.config.mjs, .htmlhintrc and
.stylelintrc.json.
Eslint, prettier and stylelintcan automatically fix minor issues with those
following commands.
Consider running these scripts from package.json before pushing code (e.g. as
githooks) or activate auto-formatting in your IDE.
However, in the pipeline we do not want the checked code to be manipulated, so we do just run checks without auto-formatting.